How to Clean and Descale Your Keurig Coffee Machine?
Welcome to the world of exceptional coffee experiences with your Keurig coffee machine! To ensure a consistently delightful cup every time, it’s crucial to understand the importance of regular cleaning and descaling.
Discover the secrets to maintaining your Keurig’s peak performance. Let’s delve into the details of How to Clean and Descale Your Keurig Coffee Machine for a truly satisfying brew.
What does it mean when Keurig says descale?
When your Keurig prompts you to “descale,” it’s not just a routine reminder – it’s a crucial maintenance step to ensure the longevity and efficiency of your beloved coffee maker.
Descaling refers to the process of removing mineral deposits that naturally accumulate over time from the water you use in your Keurig.
Necessity of Descaling
These deposits, often composed of minerals like calcium and magnesium, can build up in the internal components of your machine, affecting its performance and, consequently, the taste of your coffee.
Ignoring the descaling prompt may lead to issues such as slower brewing, reduced water flow, and even potential damage to your Keurig.
Preserving Your Coffee Machine’s Prowess
Think of descaling as a spa day for your coffee machine – a rejuvenating treatment that keeps it in top-notch condition, ensuring each cup is as crisp and flavorful as the first.
In the following sections, we’ll guide you through the simple yet essential steps of descaling your Keurig, allowing you to savor the rich aroma and robust taste of your favorite brews consistently.
Buildup: Why Descaling Matters?
Over time, the minerals present in your tap water can accumulate within the internal components of your Keurig coffee machine.
This buildup forms a layer, commonly known as scale, which can negatively impact the device’s performance. The more extensive the scale, the greater the hindrance to your Keurig’s efficiency.
Impact on Performance
As scale accumulates, it can obstruct water flow, leading to longer brewing times and, in some cases, uneven extraction.
This directly affects the flavor and temperature of your coffee, diminishing the delightful experience you expect from your Keurig.
Proactive Maintenance for Optimal Enjoyment
By addressing the descaling process promptly, you’re proactively preserving the integrity of your coffee maker.
This simple yet crucial maintenance routine ensures that each brewing cycle is as efficient and enjoyable as the first, allowing you to relish every sip of your favorite coffee varieties.
Now, let’s move on to the practical steps of descaling your Keurig, so you can continue to indulge in the rich and flavorful world of freshly brewed coffee.
What can you use instead of descaling solution?
Not having a descaling solution on hand doesn’t mean you’re out of options. Several household items can serve as effective alternatives to keep your Keurig in optimal condition.
These substitutes not only provide a budget-friendly solution but also contribute to an eco-friendly approach to maintenance.
Vinegar: The All-Natural Descaling Agent
White vinegar is a go-to option for many Keurig enthusiasts. Its acidic nature helps dissolve mineral deposits without leaving behind any harmful residue.
To descale with vinegar, simply mix equal parts of water and white vinegar and run this solution through your Keurig as you would with a commercial descaling solution.
Remember to follow up with a few cycles of water to ensure the elimination of any lingering taste.
Lemon Juice: Citrus Freshness for Descaling
If the scent of vinegar isn’t appealing, lemon juice can be a refreshing alternative.
The citric acid in lemon juice effectively breaks down scale and imparts a citrusy aroma. Mix equal parts of water and lemon juice, run the solution through your Keurig, and rinse thoroughly with water afterward.
Baking Soda: Gentle Cleaning with a Pantry Staple
Baking soda’s abrasive properties make it an excellent contender for descaling. Mix a tablespoon of baking soda with water, ensuring it forms a paste-like consistency.
Apply this paste to the areas prone to scale buildup, scrub gently, and rinse thoroughly. While not suitable for a full descaling process, it’s effective for targeted cleaning.
Experiment with these alternatives based on your preference and ingredient availability.
Guide you through the step-by-step process of descaling with these household solutions, ensuring your Keurig continues to deliver impeccable coffee with each brew.
How to Clean and Descale Your Keurig Coffee Machine?
Ensuring your Keurig coffee machine is clean and descaled is the key to a consistently delightful coffee experience.
Follow this comprehensive step-by-step guide to maintain your Keurig in optimal condition and relish the full flavor of every brew.
Step 1: Gather Your Supplies
Before you begin, gather the necessary supplies. You’ll need a descaling solution (either commercial or a household alternative like vinegar), water, a mug, and a paperclip for cleaning small components.
Step 2: Empty and Rinse the Water Reservoir
Remove the water reservoir from your Keurig and empty any remaining water. Rinse the reservoir thoroughly with warm water to remove any residue.
Step 3: Clean the Removable Parts
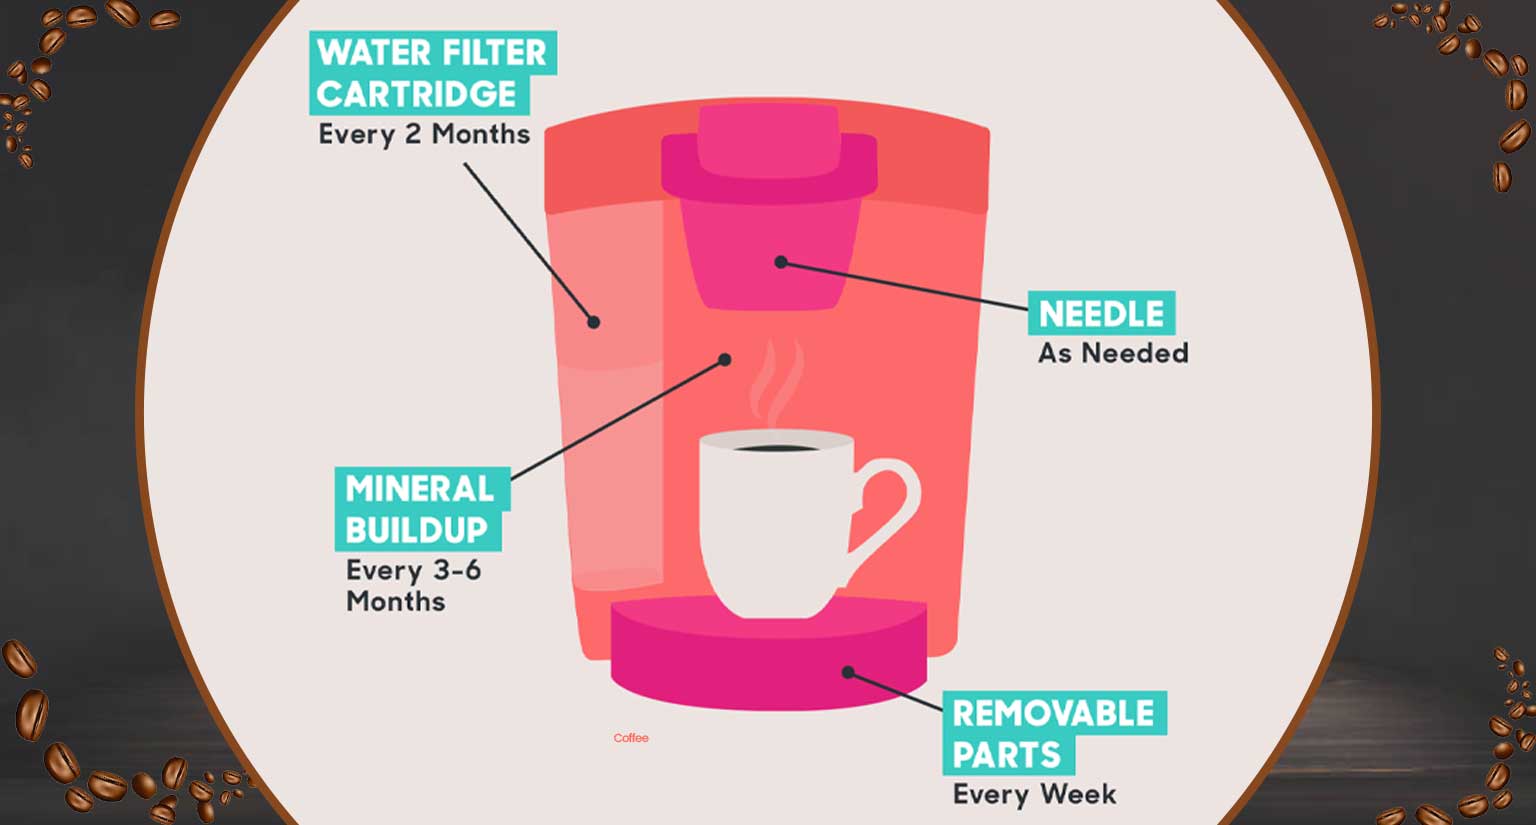
Take out the drip tray and K-Cup holder. Wash these removable parts with mild soap and water. Ensure they are completely dry before reinserting them into your Keurig.
Step 4: Run a Water Cycle
Fill the water reservoir with your chosen descaling solution or a mixture of equal parts water and vinegar. Run a brewing cycle without inserting a K-Cup. Discard the liquid in the mug and repeat this process until the reservoir is empty.
Step 5: Perform a Rinse Cycle
Refill the reservoir with clean water. Run several brewing cycles with just water to rinse out any remaining descaling solution or vinegar. Discard the water after each cycle.
Step 6: Clean the Needle and K-Cup Holder
Using a paperclip, carefully clean the entrance and exit needles. Gently remove any debris that may have accumulated. Clean the K-Cup holder with a damp cloth.
Step 7: Wipe Down the Exterior
Wipe the exterior of your Keurig with a damp cloth. Pay attention to the buttons, display screen, and the area around the K-Cup holder.
Step 8: Reassemble and Brew a Test Cup
Reassemble all parts once they are dry. Fill the water reservoir with fresh water and brew a test cup with no K-Cup to ensure that your Keurig is clean and ready for use.
Following these steps regularly, depending on your usage and water hardness, will keep your Keurig in prime condition, ensuring each cup is a delightful experience.
Now, enjoy the full flavor of your favorite coffee varieties with a well-maintained and descaled Keurig coffee machine.
How to Choose the Descaling Option on Your Keurig?
Ensuring your Keurig is descaled is essential for maintaining its performance and the quality of your coffee. Follow these simple steps to select the descaling option on your Keurig and keep your machine running smoothly.
Power On Your Keurig
Ensure your Keurig is plugged in and powered on. The machine needs to be in an active state for you to access the descaling option.
Open and Close the K-Cup Holder
Open the K-Cup holder on your Keurig and then close it. This action signals to the machine that you’re ready to initiate a maintenance cycle.
Check the Water Reservoir
Ensure there is enough water in the reservoir to complete the descaling process. If the water level is low, fill it to the required amount. Most Keurigs have a minimum fill line marked on the reservoir.
Access the Menu
On the control panel of your Keurig, locate the menu button. Press it to access the menu options. The menu button is typically labeled and may have an icon resembling a cup or settings gear.
Navigate to Maintenance Settings
Within the menu, navigate to the maintenance or settings options. The exact wording may vary depending on your Keurig model. Use the arrow or selection buttons to move through the menu until you find the maintenance section.
Select Descale Option
Once in the maintenance menu, look for the descale option. Use the arrow or selection buttons to highlight and choose the descaling function. Confirm your selection if necessary.
Begin the Descaling Process
After selecting the descale option, your Keurig will prompt you to confirm the action. Confirm, and the machine will initiate the descaling process. Follow any on-screen instructions provided by your Keurig during this cycle.
Rinse and Brew
After the descaling cycle is complete, your Keurig may prompt you to run a few rinse cycles with clean water. Follow these instructions to ensure all descaling solution is thoroughly flushed from the machine.
Choosing the descale option on your Keurig is a straightforward process, and regular descaling will contribute to the longevity of your coffee maker and the consistent quality of your coffee.
Frequently Asked Questions (FAQs)
Q1: How often should I descale my Keurig?
The frequency of descaling depends on the hardness of your water and usage. As a general guideline, it’s recommended to descale your Keurig every 3 to 6 months.
If you notice a decrease in performance or the taste of your coffee changes, it’s a good indicator that descaling is needed sooner.
Q2: Can I use regular vinegar for descaling?
Yes, white vinegar is a common and effective household alternative for descaling your Keurig. Mix equal parts water and white vinegar and run the solution through your machine. Be sure to follow up with several cycles of water to eliminate any lingering taste.
Q3: What happens if I don’t descale my Keurig?
Neglecting to descale your Keurig can lead to mineral buildup, affecting water flow, temperature, and overall performance.
This can result in longer brewing times, uneven extraction, and a decline in the taste of your coffee. Regular descaling is essential to maintain the longevity and efficiency of your coffee machine.
Q4: Can I use a commercial descaling solution instead of household alternatives?
Absolutely. Commercial descaling solutions designed for coffee machines are formulated to effectively remove mineral deposits without causing damage.
Follow the manufacturer’s instructions for proper usage and ensure thorough rinsing after descaling to prevent any residual taste.
Q5: Is it necessary to clean removable parts like the drip tray and K-Cup holder?
Yes, cleaning removable parts is an important aspect of Keurig maintenance. Wash the drip tray and K-Cup holder with mild soap and water regularly. Ensuring these components are clean contributes to the overall hygiene and functionality of your Keurig.
Q6: How can I tell when my Keurig needs descaling?
Keurig machines are equipped with indicators that prompt you to descale. If you notice the descale indicator on your display or experience issues like slower brewing or reduced water flow, it’s time to descale your Keurig.


